Vegetarian


This past weekend I was in the lovely Comox Valley on Vancouver Island.  A good friend is back from literally a trip around the world: 14 months in Nepal and then they traveled to Maui, the Philippines, Iceland, France, Germany, Amsterdam etc…so off we went for a visit with her at her parents.  They live on an very tranquil piece of property just outside of Courtney, BC.

Good times, wine, food and friends makes for a wonderful weekend.  After a morning at the spa: walking a hydro path, a fantastic lunch at Atlas and a snooze on the lawn in the afternoon sun, we decided to round out the weekend with a chilled west coast tradition. So, Sunday evening just us ladies packed a picnic for the beach, made a campfire in the wind, ate some good food, chatted and drank Babyduck.  One of the goodies in the cooler that we packed was a delicious curried quinoa salad.

This salad is packed full of protein.  And gets better as the flavours meld in the fridge, so a great meal to make and have in the fridge for lunches or a light summer dinner.  I love the savoury coupled with the sweet, the crunchy and the chewy.  Mmmm.

curried quinoa salad

Ingredients
1 lime
3 Tbsp low sodium soy sauce
1 Tbsp sesame oil
1 Tbsp freshly grated ginger
1/2 pkg extra firm tofu cut into 1 inch cups
1 cup quinoa
2 1/2 cups chicken or vegetable broth
1/2 cup walnuts
1 cup shredded carrots
3 green onions sliced
1/4 cup fresh parsley
1/4 cup fresh cilantro
3/4 cup dried apricots sliced
1/2 cup dried cranberries (optional)
1 tbsp canola oil

Dressing
2 tbsp curry powder
1/4 cup fresh squeezed lime juice
1 Tbsp honey
1/4 cup canola oil

Directions:

  1. Squeeze juice from lime into a medium bowl.  Stir in soy sauce, sesame oil and ginger. Add tofu and marinate for 30-40 minutes.
  2. Place quinoa in a sieve and rinse thoroughly.  Drain and place in a medium sauce pan along with the broth.  Bring to a boil.  Cover, reduce heat and simmer until all liquid is absorbed, about 10-15 minutes.  Remove from heat, fluff with fork, set aside.
  3. While quinoa is simmering, preheat oven to 350F. Place walnut pieces on a baking sheet and toast until golden brown and fragrant, about 8-10 minutes.
  4. In a large bowl, combine carrots, green onion, parsley, cilantro, apricots, toasted walnut pieces, cranberries (if using) and cooked quinoa.
  5. For dressing mix curry powder, lime juice, honey, and canola oil in a seal-able container, shake well to mix and pour over quinoa mixture and mix.
  6. Refrigerate salad for at least one hour.  Heat canola oil in a skillet over medium heat: remove tofu from marinade and cook for 2 or 3 minutes per side until browned.  Add cooked tofu to quinoa salad mixture, mix and serve.

Glow, May 2010 pg. 92


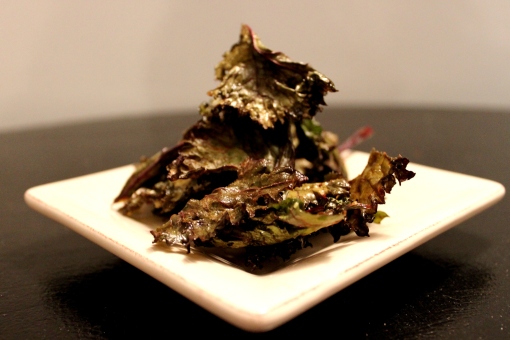
Ages ago I had seen recipe after recipe in the blogosphere for kale chips. I was a skeptic. I mean, really?  You take a delicious and relatively sturdy green and it becomes a tasty, crispy savoury snack?  Well finally last weekend, I grabbed a bunch of Kale and decided to try my hand at it.  There were tons of recipes that offered bits of cheese melted onto the kale as it dried, or basic salt/pepper combos etc.  I am on a bit of an Asian fusion kick right now, so I decided to mix rice wine vinegar and sesame oil with a tiny bit of olive oil.  The key to this whole process is moderation – moderation of flavours as they intensify as the leaf dehydrates.

I made the mistake in my first batch to add some salt before they came out of the oven.  They were just a little too salty for me. I waited the second time and found they didn’t need salt at all.  If this intrigues you, try googling a variety of recipes. You can make these in your oven (like me) or if you happen to have one, a dehydrator.

sesame kale chips

Ingredients:

4 cups kale chopped into 2 inch pieces, stem removed from leaf
2-3 Tbsp rice wine vinegar
1 Tbsp sesame oil
1 Tbsp extra virgin olive oil
salt (optional)

Directions:

  1. Preheat oven to 350 and line a baking sheet with parchment paper (if you have it, I found I didn’t need it, but my sheet was in pristine shape)
  2. In a large bowl, whisk together vinegar, oil, and salt, and toss with kale leaves. Place in a single layer on cookie sheet and place into oven.
  3. Bake 10-15 minutes, flipping halfway through until crispy. A hint on a few sites was to not overcook or allow them to become completely brown as they will taste bitter.
  4. Taste one, and lightly salt – I used a seasoned wasabi salt which was a nice touch.  Enjoy!

I am one of those impatient people who has a hard time waiting for an avocado to reach the perfect ripeness for guacamole.  I pick up the avocado from the store, usually knowing that it will need another 3 days or so to become that almost butter like consistency.  But then I get home and I see it sitting on the counter…eying me.  Tempting me to give it a try.  I mean, if you through it in the food processor for long enough it should get smooth like peanut butter right?  Wrong.  It just gets lumpy and is nowhere near the right flavour or of course, right texture.

The other day I was in the store and looked at the avocados and they called to me.  They were sinfully soft without being overripe.  They begged to be whipped into a smooth and tasty guacamole.  I mixed and matched what we had in the fridge to come up with this and I loved it.  I think it was the extra kick of the Mexican Chili powder and the smokeyness of the cumin.  When an avocado calls to you…whip this up, you won’t be disappointed!

Ingredients:

2 ripe avocados
1/2 sweet yellow onion
1 clove garlic
handful of cilantro or parsley
3 Tbsp spicy salsa
juice from one lime
1 tsp Mexican chili powder
1 tsp ground cumin
salt and pepper to flavour

Directions

Through it all into a food processor and blend.  Then let sit in the fridge for a couple of hours to let the flavours mingle.  To prevent browning keep the avocado pits in the guac and then remove.  Enjoy!


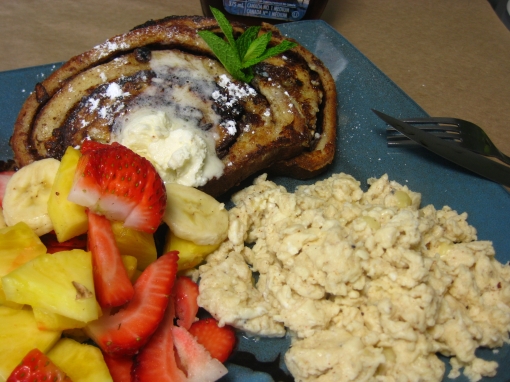
A few weeks back I baked Dorrie Greenspan’s Raisin Swirl bread.  One of the notes in the book was that this made a mean french toast…so Sunday morning sounded like a perfect test.


We hadn’t used the whole loaf, had thrown it into the freezer and thus a scrumptious breakfast in no time flat.  Not to knock maple syrup, because don’t get me wrong, I love the o0ey gooey sweetness of real maple syrup, but I think the flavoured butter that you see melting down the French Toast is what made it!  The best thing is that the butter was actually icing left over from the wedding cake the same weekend…double use, one recipe!

french-toast

Ingredients
French Toast
4 slices Raisin Swirl Bread
1 Tbsp butter
2 eggs
1/4 cup milk
1 oz Fireball whisky – don’t know why I threw this in, maybe the cinnamony taste, but soooo good!
pinch of cinnamon
pinch of nutmeg
1 Tbsp brown sugar

Lemon Buttercream
3 Tbsp butter – room temp
2 Tbsp sifted icing sugar
juice from half a lemon
zest from lemon

Directions:

  1. Prepare flavoured butter: in a bowl whisk together all ingredients, the more you whisk, the lighter it gets.
  2. A low, large bowl whisk together: eggs, milk, fireball(!), cinnamon, nutmeg, sugar.
  3. Melt butter in a skillet, on med/med-high heat.
  4. Dredge bread in egg mixture.  Because the bread is quite dense, let it sit a little and absorb the mix.
  5. Once butter is fully melted in the pan, add the bread (2 at a time).  Flip when golden crispy on the bottom.
  6. Top with lemon butter – serve with a fruit salad.

At work we talk about effort in, in relation to, results out.  In terms of a recipe, this is short and simple.  But the results are spectacular.  I never tire of the recipes you can make with a deliciously slooow roasted, sweet and intense tomato.  The key is long and low in the oven.  It’s 5 minutes before bed, and then a quick pasta for dinner the next day.  Or a deep rich tomato soup.  It’s totally up to you.

roasted-tomatoes

Ingredients:

2 lbs on the vine campari tomatoes, ripe
1 head (yes head) garlic, cloves peeled
2 Tbsp extra virgin olive oil
pinch of salt
fresh cracked black pepper

Directions:

  1. Preheat oven to 150-160 F
  2. Wash and halve tomatoes
  3. Arrange halves, face up in a Pyrex casserole dish
  4. Spread garlic cloves amongst tomatoes
  5. Drizzle olive oil over
  6. Season with salt and pepper
  7. Place tomatoes in oven and roast for 10-12 hours, checking every few hours.

Toss with freshly cooked pasta, fresh basil and feta.  A meal in minutes….errr…hours?


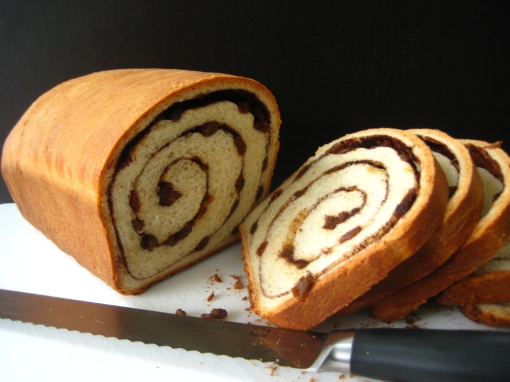
Wow!  I loved making this!  So many of my preferences for food are centred around my memories as a kid.  My grandma used to look after my brother and I when we were little – a few days a week after school when mom was at work.  Our standard after school snacks were chocolate chip cookies she made, or raisin bread from the local bakery (slathered in butter – I know, how bad for you!).  I loved, loved, loved the raisin bread.  It was so soft, light and sweet!

Yesterday, I was looking through cookbooks at our local bookstore, and came across a “hurt” version of Baking from My Home to Yours – by Dorrie Greenspan (yes, the Dorrie of the Tuesdays with Dorrie baking group).  I have been waiting to pick this up for a while now, and just felt too guilty dropping $50 on a cookbook when I had so many already – but at over 50% off for a book that had a little hole in the jacket, I couldn’t not pick it up! As I mentioned in my Whole Wheat Bread post, I am trying to learn and appreciate working with yeast.   So the first recipe I tried from Dorrie’s book was Raisin Swirl Bread.

As the dough was rising, the sweet aroma wafted through the house.  As it baked I took the dog for a super quick pee break and came back into the house welcomed by that fresh bread waft…so lovely.  And isn’t it so pretty?!  So this is dedicated to my grandma – whom I don’t see very often, but love a lot.

raisin-swirl-bread

Ingredients

For the bread
1 packet active dry yeast
1/4 cup sugar, plus a pinch
1 1/4 cups just warm to the touch whole milk
1/2 stick (or 4 Tbsp) unsalted butter – room temp
3/4 tsp salt
1/2 tsp clear vanilla extract
Pinch of freshly ground nutmeg (I cheated and used pre-ground)
3 3/4 to 4 cups AP flour

For the swirl
1 Tbsp sugar
2 tsp ground cinnamon
2 tsp unsweetened cocoa powder (this was optional, but we did it)
1 cup moist – plump raisins (dark or golden)
3 Tbsp unsalted butter – softened

Directions:

  1. Put the yeast in a small bowl, toss in the pinch of sugar and stir in 1/4 cup warm milk.  Let rest 3 minutes, then sitr – the yeast may not have dissolved completely, and it may not be bubbling, but it should be soft.From here, Dorrie uses an electric stand mixer- in the world’s smallest kitchen, we don’t have space for that… so out comes the wooden spoon!
  2. Combine the remaining milk, butter and 1/4 cup sugar and mix with a hand held mixer for 1-2 minutes.
  3. Add the salt, egg, vanilla and nutmeg and mix for one minute – at this point the mixture can look pretty “curdy”
  4. Ass the yeast mixture and beat on medium low for 1 more minute.
  5. Add 2 3/4 cups flour and on low speed mix until it just comes together – this is now when I switched to the wooden spoon. (or you could switch to a dough hook)
  6. Add another 1 cup of flour – beat it with the wooden spoon until it comes together and is almost clean of the sides of the bowl.  (Ass up to 1/4 cup more AP flour, 1 Tbsp at a time)
  7. Dorrie says the dough can’t really be kneaded by hand – it would be too soft… I didn’t find this. Turn dough out onto lightly floured surface and knead 5 minutes or until is smooth and has a lovely buttery sheen.
  8. Boil a kettle of water – create a water bath in the oven.
  9. Butter a large bowl – turn the dough into the bowl and cover the bowl tightly with plastic wrap.  Place the dough in the oven (turned off) with the water bath below.  Let dough rise until is about double in size 1 1/2 hours approx.
  10. Scrape the dough onto a large piece of plastic wrap, and wrap tightly.  Place in freezer for 30 minutes – or long enough to firm up to be rolled easily.  (At this point you can instead refrigerate the dough overnight if that is more convenient (I wish I had done this – in all this is a long process, and to eat it fresh in the morning, this would have aided the process!)
  11. Make the swirl: combine sugar, cinnamon and cocoa in a small bowl.
  12. Butter a 9×5 loaf pan.Dorrie suggests checking to make sure your raisins are nice and plump/moist – I had never really thought about this before…she suggested that if they are a little hard, to steam them.  I did this in our steamer, and then patted them dry – the result was what tasted like fresh (if you can have fresh) raisins – brilliant!
  13. Place dough on a large, lightly floured work surface and roll into a rectangle about 12×18.
  14. Gently smear 2 Tbsp of the butter on the rectangle – use your fingers!
  15. Sprinkle sugar over the mixture and scatter the raisins.
  16. Starting at the short side of the dough, roll it up jelly-roll fashion – make sure to roll it snugly.
  17. Fit the dough int the buttered pan, seam side down and with the ends tucked under the loaf.
  18. Cover the pan loosely with wax paper and set in warm place.  Let the dough rise until it comes just a little above the edge of the pan – about 45 minutes. I placed back in the oven until I was ready to preheat and then I moved it to the microwave – no drafts that way!
  19. When the dough has almost fully risen, preheat the oven to 375 degrees F – place rack at centre in oven.
  20. Melt remaining butter, brush exterior of loaf with it.
  21. Put the bread on a baking sheet lined with parchment paper or a sil-pad.  Bake for 20 minutes, then cover loosely with a foil tent and bake for another 25 minutes, or so.  The bread should be a lovely golden colour and sound hollow when you knock on the bottom of the loaf.
  22. Transfer the pan to a rack and cool for 5 minutes – then unmold.  Allow to cool to room temperature – and then ENJOY!

Delicious plain and simple, or toasted with a little butter – OR as Dorrie suggests make french toast – how wonderfully decadant!

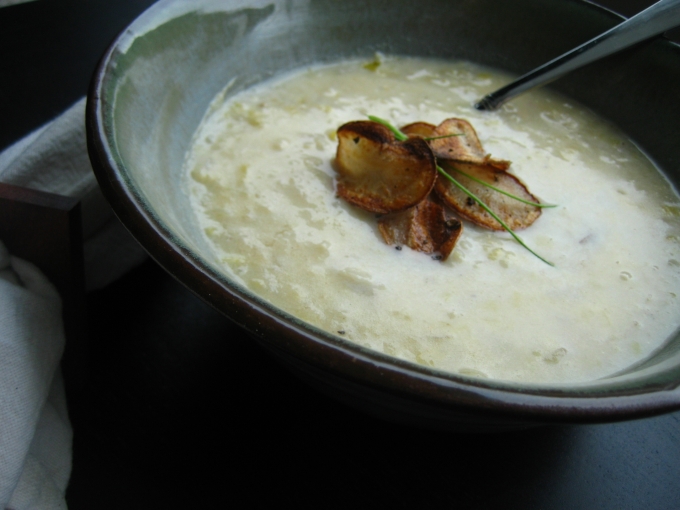
I was reading somewhere that this year has been one of the latest springs in over 20 years.  The idea of spring, the sun, the warmth, the fresh evening smell…everyone is waiting with bated breath for it.  We’ve been teased.  A sunny day or two strung together and it seems there is a collective sigh of relief.  And then rain and heavy clouds return.  April showers and all that…So, while we wait a little while longer, I felt that a heart soup was in order.  On a wet rainy Saturday night, this soup hit the spot. I am sure you could add cubes of ham, or pancetta to the onions and leeks while sauteing and it would add a nice depth of flavour.


Served with homemade wheat bread and a spinach salad.  Dinner with a friend, and a movie was a relaxing break from the hectic world.  Ohhh…and don’t forget the wine!

potato-and-leek-soup

Ingredients:
3 Tbsp extra virgin olive oil
1 large sweet yellow onion, chopped
2 leeks, cleaned very well and sliced finely – only the white and light green parts
6 russet baking potatoes, thinly sliced
4 cups veggie stock
1 cup heavy cream
salt and pepper to taste

Directions:

  1. In a large dutch oven, heat oil.
  2. Add onions and leeks, stirring occasionally, cook until they begin to brown.
  3. Ass potatoes
  4. Cover with veggie stock, bring to a low simmer.
  5. Cook for 15-20 minutes.
  6. With a potato masher, puree up the soup.  As chunky or fine as you like.
  7. Add cream, bring to low simmer.
  8. Season with salt and pepper.

For a United Way fundraising auction at work, I put up four Fridays worth of baking for the winner to share with their office-mates.  This week I tried a recipe that Annie at Annie’s Eats had made a few weeks ago…

They turned out great!  I haven’t made filled cupcakes in forever, apparently this recipe said you could just pipe the filling in, however as Annie commented on her blog, they were just too dense.  I used the cone method instead.  I went with mini’s when I found mini-Oreo cookies at the store.  I really like one or two bite desserts, you get the flavour and treat factor without eating a gigantic cupcake high in all the stuff you’re not supposed to eat too much of!

So thank you to Annie and to Dinner with Danielle (whom Annie got the idea from).  I will definately be making these again…perhaps with a drizzling of caramel – would add a little complementary salty flavour to the equation.

oreo-mini-cupcakes

Ingredients:
For the cake:
2 1/3 cups all-purpose flour
1 cup unsweetend cocoa powder, sifted
1 1/2 tsp. baking powder
1/2 tsp. baking soda
1/2 tsp. salt
12 tbsp. unsalted butter, at room temperature
2 cups firmly packed light brown sugar
2 tsp. vanilla extract
4 eggs
1 1/2 cups buttermilk, at room temperature

For the “frosting”:

2 cups plus 2 tbsp. whipping cream
6 tbsp. powdered sugar
1 tsp. vanilla extract
1/2 cup Oreo cookie crumbs

For garnish:
56 mini-Oreo cookies

Directions:

  1. To make the cupcakes, preheat the oven to 350 degrees F.
  2. Line two cupcake pans with paper liners.
  3. In a medium bowl, sift together the flour, cocoa powder, baking powder, baking soda and salt; set aside.
  4. In the bowl of an electric mixer, beat the butter on medium speed until smooth.
  5. Gradually add the brown sugar and continue beating until fluffy, scraping down the sides of the bowl as needed.  Beat in the vanilla.
  6. Add the eggs one at a time, beating well after each addition.
  7. With the mixer on low speed, add the flour mixture in three additions, alternating with the buttermilk, beginning and ending with the flour mixture.
  8. Mix just until all the dry ingredients have been incorporated, being careful not to overmix.
  9. Divide the batter between the prepared cupcake liners.  Bake until a toothpick inserted in the center comes out clean, about 0-12 minutes.  Transfer the cupcakes to a wire rack and let cool to room temperature.
  10. To prepare the frosting, in the clean bowl of an electric mixer fitted with the whisk attachment, combine the whipping cream, powdered sugar, and vanilla extract.  Beat on medium-high speed until the whipped cream holds stiff peaks.  Gently fold in the cookie crumbs with a spatula.
  11. Cut the tops of cupcakes off in a cone shape, reserve tops.
  12. Scoop the mixture into a pastry bag and fill cupcakes – top with set aside tops.
  13. Pipe frosting decoratively on top of the cupcakes.  Garnish with Oreo cookie.

Yields 56 mini cupcakes

WW2


Everyone has comfort foods.  Some are better for us than others.  Borscht was one of my favourites as a kid.  My mom would make it in the BIG soup pot, it would simmer for hours on end.  Once she took it off the stove, the pot was way too big to put in the fridge, so it would sit out on the kitchen balcony or in the garage waiting for it to come down in temperature so that Tupperware containers could be filled and frozen for easy-to-grab family winter weekend lunches.

The debate I have gotten into as an adult is, is this really borscht?  When you Google “borscht” you often get a recipe that has beets in it, or beef…this has neither.  Mom tells me she learned how to make this from “the Russian Immigrants in Greenwood”  – almost like that is what their name tags said… When looking at all the various European versions on Wikipedia I think that this is kind of borscht, an adaption of many versions.

Alas, whatever you call it: Tomato/Cabbage soup, or winter borscht, or just ‘yum’, this soup is easy, tasty and full of good for you ingredients.  If you like tomatoes and simple soup, you may like this.  Serve it up with a dollop of low-fat sour cream and crust bread and it is delsih!

I know it isn’t much to look at – but really, what do you expect from cabbage?  This soup is best served the next day once all the flavours intensify and settle together.  I’ve also scaled it down and made it a little more manageable…enough to serve 6, or provide lunch throughout the week for TB and I.

borscht
Ingredients:

2 tbsp margarine
2 medium yellow onions, diced
4 celery ribs, sliced
2 cups grated carrots
1/2 green cabbage, shredded
1 L canned tomatoes – used my last jar from the summer!
1 L beef or veggie stock
1 russet baker potato, grated
2 bay leaves
2 tsp salt
(salt and pepper to taste as needed)

Directions

  1. In a dutch oven, melt margarine and saute onions for 3-4 minutes on medium-high.
  2. Add shredded cabbage, carrots, and celery to pot.  Allow to saute for about 8-10 minutes.
  3. Add canned tomatoes, break up with a wooden spoon.
  4. Add stock – should cover veggies – allow to simmer for 20 minutes.
  5. Add grated potatoes, salt and bay leaves.  Cover and simmer for 2 hours over low heat, stirring occasionally.  Watch the heat, if you simmer too high you will burn your veggies.
  6. Remove from heat and remove bay leaves. Allow to come to room temperature before putting in fridge.
  7. Reheat and serve the day after.  As mentioned, you could add a dollop of sour cream when you serve it.

Serves 6.
WW3


I am officially back in the kitchen!  The conference I have been working on finally came together and went off without a hitch!  It feels like for the last two months I have just been counting down to Saturday – and then it came…and went.

One of the fun presents I got this year for my b-day was a pasta maker from TB’s parents!  I was so excited.  With little to no space in the world’s smallest kitchen I have put off getting one for a long time.  But this year when asked what I would like for my birthday I finally said, a pasta maker – we will just have to find space for it!  For the last two weeks it has been sitting in its box on the kitchen table taunting me.  I knew exactly what I wanted to make as soon as I unwrapped the present.

This pasta maker is the cadillac version in my opinion.  The Marcato Multipast makes 7 different pastas, including stuffed tortellini!  I have made pasta by hand a few times.  I haven’t found that I have been able to roll it out as thin as I want to.  Using a pasta maker makes such a difference.  The end result, soft, silky rolled out noodles – loved it! A big thank you to P&M!

With the fettuccine I made, we made cashew chicken pasta, one of our favourites.  Stay tuned for that recipe!

From this…

dough-ball2

roll-12

cutting-noodles2

noodles-on-towel2

finished-noodles1

…to this!

Ingredients:

1 cup AP flour
1 egg, whisked
1/4 tsp salt
2 tbsp water
1 tsp extra virgin olive oil

Directions:

  1. In a bowl combine flour and salt.
  2. Make a well.
  3. In a smaller bowl, whisk egg, add oil.
  4. Add egg mixture to flour well, slowly combine eggs into flour.
  5. Knead the dough with your hands until it is completely homogenous and consistent.
  6. If the mixture is too dry, add some water, if it is too soft, add some flour.  A good mixture will should never stick to your fingers.
  7. Remove the mixture from the bowl and place onto a light floured surface.  Kneed for 3-5 minutes.
  8. Follow steps to roll out pasta that are specific to your machine.  Those for mine follow:
    > Set the machine regulator to position 1, pulling it outwards and turning it so that the two smooth rollers are completely open (approx 3 mm)
    >Pass a piece of the mixture through the machine turning the handle. Repeat this operation 5-6 times, folding the dough over and adding some flour to the middle if necessary.
    >When the dough has taken a regular shape, pass it through the rollers once only with the regulators set on number 2 through to 7.
    >With a knife cut the dough crossways in pieces approximately 25 cm long.
    >Transfer the dough to the cutting rollers, turn it slowly and pass the dough through.
  9. Place the pasta on a towel or a rack to dry for at least an hour.
  10. Pasta can keep for 1-2 weeks if kept in a cool, dry place.

Cooking Directions:

  1. Bring a pan of salted water to a boil.
  2. Add pasta, remember fresh pasta cooks in just a few minutes (2-5 minutes depending on the thickness)
  3. Stir gently and then drain the pasta once it has finished cooking.

Next Page »