Baking


TB’s friend is getting married in two weeks. The boys wanted to plan a weekend in Vegas, but the groom was in a car accident and long flights just weren’t an option. So they did Vegas in Van-city.  Friday night was boys night out… suits, cigars, scotch and other things…. tonight is a poker tournament and a big BBQ.  I offered to make a cake in the theme.

This friend is pretty picky when it comes to flavours. He doesn’t like creams, custards etc. Normally if I was to make a cake, I would want to add flavour through the filling. His preferred filling was chocolate chip mint.  Mint as a filling reminds me of the 80’s – probably because as a kid I LOVED it and always wanted icing to be flavoured with it… and now, no interest. So the cake itself is not too interesting. The decorating worked out ok. I used chocolate fondant dyed black, and then regular fondant in green for the felt. All the pieces are edible (except for the playing cards).  The picture is a little fuzzy, but I didn’t think to bring a camera, only had my phone. Still, for something whipped together Friday night for Saturday, I was pretty happy with it.   Congrats to J & T. Hoping they have a long happy life together.


A few weeks back I had a friend over for dinner. I always love the smell of freshly baked bread when having company…so homey.  I had seen  a recipe on The Knead for Bread that I thought was pretty cool. It was a basic white bread, but rolled out like a jelly role, spread with pesto, rolled then sliced, finally twisted to ensure the pesto is spread throughout.  The technique is something I will bring to other “swirl breads”, it was beautiful!

I had an abundance of garlic scapes in the fridge that desperately needed to be used. No pine nuts and a guest who didn’t like Parmesan cheese.  So I worked with what I had. The result was a very tasty sun-dried tomato pesto.  I followed the bread recipe exactly.  It was a little dense, not as light of a crumb as I would have liked, but dunked in extra virgin olive oil and balsamic vinegar, it was still very tasty.  And for a few days to keep it fresh and as a great snack, I found throwing it in the toaster for a light toast was perfect.

I won’t re-write the recipe for the bread on my site, as you could follow the very clear steps laid out on the original recipe’s site. However, I was happy with the “pesto” that was infused throughout, so instead, that is what you will find here.

Ingredients:

4 garlic scapes roughly chopped
1/4 cup toasted walnuts
6 sun-dried tomatoes softened (either soaked in hot water, or packed in olive oil)
1/4 cup black olives
Extra virgin olive oil
1 cup mozzarella cheese shredded
salt and pepper, to taste

Directions

  1. Shred mozza and set aside
  2. Combine garlic scapes, walnuts, sun-dried tomatoes, and black olives  in food processor, puree.
  3. Add olive oil until everything comes together and makes a thick paste, probably about 1/3 of a cup
  4. Mix pureed mixture with mozzarella, season with salt and pepper.

A note that the garlic scapes will be very powering raw, but as they bake in the bread they totally mellow out.


Friends got married last weekend.  They are a fantastic match and I am so happy for them!  It was a beautiful day, the sun was shining, but it wasn’t so hot that the men sweating in the sun, or the women had make up melting off their faces.

In February I was asked by the couple to make their wedding cake. I asked what they were thinking about. They wanted simple.  Good, because who are we kidding, while I enjoy baking I am no pastry chef!  I have made small cakes that serve 20-40 at most, not 150.  So I said yes, and offered the cake as my wedding present to them.

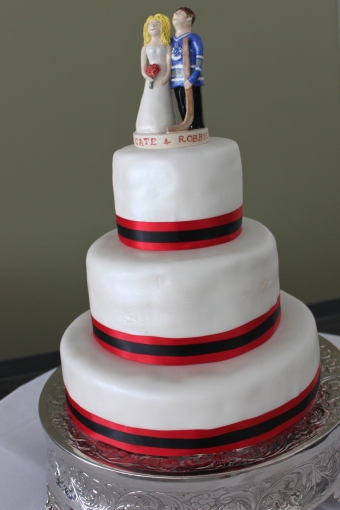
The cake was simple. Three tiers, three layers of cake in each tier. The bottom tier was chocolate brownie cake with a vanilla cream icing, and raspberry filling.  The middle tier was simple vanilla cake with a chocolate/Baileys (yes, can you say yum!) icing and the raspberry filling again.  And the top tier was chocolate/vanilla cake combo with the various fillings as well, kind of the uber tier.  The whole thing was covered in a vanilla buttercream with fondant.  Brushed with pearl dust to give it an iridescence that you can’t really see in the photos and finished off with ribbons in their wedding colours.  The cake topper was made by the bride’s mom – a personal touch to the couple.

3 tier wedding cake with ribbon

wedding cake cutting

sliced vanilla wedding cake

So congratulations to Robbie and Cate!

May their years together be long and plentiful, full of love, laughter, and of course…good food!

Months have gone by.  To list all that has happened in that time doesn’t make sense here. So instead, we will discuss food.  And for me, food is often associated with memories.  Is there anything more comforting than the smell of muffins wafting from the oven on a weekend morning? I had a bunch of nearly over-ripe bananas that desperately needed to be used up.  Whipping up some fresh muffins meant a grab and go breakfast for the week ahead, and a relaxing start to a bright and sun filled Saturday morning.

The twist to these muffins was a little sweetened coconut.  I used a recipe found on Simply Recipes and just slightly modified.  In less time than it took the oven to pre-heat to 350F the batter was ready.  So if you find yourself with 3-4 ripe bananas I recommend trying these.

Ingredients
3 or 4 ripe bananas, smashed
1/3 cup melted butter
3/4 cup sugar
1 egg, beaten
1 teaspoon vanilla
1 Tbsp espresso or strong coffee (optional)
1 teaspoon baking soda
Pinch of salt
1 1/2 cup of flour
1 cup chopped walnuts (toasted or raw)
1/4 cup sweetened coconut

Directions

  1. Preheat the oven to 350°F. With a wooden spoon, mix butter into the mashed bananas in a large mixing bowl.
  2. Mix in the sugar, egg, coffee and vanilla.
  3. Sprinkle the baking soda and salt over the mixture and mix in.
  4. Add the flour, mix until it is just incorporated. Fold in the chopped walnuts and sweetened coconut.
  5. Pour mixture into a prepared muffin tin. Bake for 25-30 minutes. Check for doneness with a toothpick inserted into the center of a muffin. If it comes out clean, it’s done. Cool on a rack.

makes 6 jumbo muffins (seen in the picture above) or 12 regular muffins

adapted from Simply Recipes


It’s cookie season.  It’s cookie exchange time. I love seeing what everyone makes.  I love that there are twelve days of cookies on Foodtv.com.  Ironically I don’t even love cookies.  I just love the opportunity to get into the kitchen.  I love trying something new.

My mom and my brother’s girlfriend get together every year around this time to spend a whole day in the kitchen and make winter goodies.  It’s the winter equivalent of “putting up” the harvest by canning in the fall/summer I suppose.   This is one of the recipes they had tried together.  My mom was telling me that I “had to try” to make them.  That they would be so easy and you just couldn’t go wrong with them.  Perhaps she was right…but it took me way longer to make these than it would have taken me to make regular cookies, and in my oh, so humble opinion they were waaaaaaaaay more labour intensive than drop cookies.

That being said, they aren’t really cookies.  They are more of candies.  Almonst a chewy Almond Roca.  I thought my mom had created these, but upon some internet searching, I believe it was Giada De Laurentis’ recipe.  As usual, I reviewed and looked at ways to put my own spin on them.  I opted to roll them in chopped up toasted almonds.  Building on the almondy goodness.

As I munched on my one tester.  I think I would do them differently next time.  I think the idea is right, but the texture needs a little work.  The caramel centre is a little confused.  It is kind of chewy, and kind of brittle.  I feel like it needs to be one or the other…otherwise my jaw might need strengthening if I was to eat these on a more regular basis…come to think about it, perhaps it is a good idea that you can only eat one or two at the most at a time.  IF I was to make these again, I think I would make my own caramel.  I would add the almonds to the silicone liners and then ladle in the almond roca caramel mixture into the cups, cool and set, and then dip in the choclate and roll in the crushed almonds.  Basically creating little Almond Roca bites, rather than the bark I made a few years ago.

Ingredients:

1/2 cup (about 3 ounces) toasted slivered almonds
24 individually wrapped caramel candies (about 6 ounces)
1 cup (about 6 ounces) bittersweet chocolate chips
4 to 6 tablespoons cream, room temperature, divided
1 cup (about 6 ounces) white chocolate chips

1 cup toasted chopped slivered almonds

Directions

  1. Preheat the oven to 350 degrees F.
  2. Lightly grease the mini-muffin tins with vegetable oil spray. If you have silicone mini muffin liners or the pan, use that instead and you won’t need the oil.
  3. Place 1 teaspoon of slivered nuts in each of the muffin cups. Unwrap the caramel candies, cut each candy into quarters and place 2 quarters (1/2 candy) in each of the muffin cups, in the bottom, add the nuts and then add the other 2 quarters on top of the nuts in a single layer. Bake in the oven until the caramel is just melted and beginning to spread, about 8 minutes. Be careful not to over melt the caramel or it will bubble, burn, and become too hard. Place the mini muffin tins in the refrigerator for 5 minutes to cool. Remove the nut clusters from the tins and set aside.
  4. Meanwhile, melt the bittersweet chocolate in a double boiler over low heat. Whisk 2 to 3 tablespoons of cream into the chocolate to slightly thin the chocolate for coating the clusters. Dip half of the nut clusters in the bittersweet chocolate , remove exand place on a parchment paper-lined baking sheet. Return the clusters to the refrigerator to harden, about 30 minutes.
  5. Melt the white chocolate in a double boiler over low heat. Wisk 2 to 3 tablespoons of cream into the chocolate to slightly thin the chocolate for coating the clusters. Dip remaining half of the nut clusters in the white chocolate and place on the parchment paper-lined baking sheet with the other chocolate-covered clusters. Return the clusters to the refrigerator to harden, about 30 minutes.


Cookies, cookies, cookies! A few weeks back, I attended a cookie exchange, hosted by non-other than the lovely Ms. Jackie Connelly. A sunny (albeit, blustery) Sunday afternoon, armed with two dozen cookies, and a bottle of wine, I spent the afternoon with some fantastic foodies.

Cookie exchanges are a fantastic way to expand your horizons. Sometimes we, and by we, I really should really say, I get into ruts in the kitchen. I tend to default to the tried and true. As a kid, my mom made THE best chocolate chip cookies. Undoubtedly there was always cookie dough in the freezer to thaw and have cookies at your finger tips. That tends to be my go-to cookie.

A cookie exchange means you can stay within your comfort zone, if you really want, but sample the wonderful selection brought to the table from all the other participants. You could always make your usual, but why not try something new? There are so many options out there, it can almost become overwhelming. Narrow it down, do you want chocolate? Chewy? Traditional? Maybe you don’t even want a cookie, but perhaps a truffle…be daring!  For a handful of great recipes from this cookie exchange, you can find them on Jackie’s site.

In my adult life, access to cookies was/is not as important. I prefer savoury to sweet. But, it is the holidays, there are guests, and little home-baked packages to be dropped off…and so, into the kitchen we all head.

As usual, I started with a base recipe, tweaked it, and made it my own. I was inspired to put a little wasabi salt on the chocolate as it set to counter the sweetness of the chocolate, and compliment the buttery-ness of the shortbread. It’s all about exploration right? And in this case, I thought it paid off!


Ingredients

3/4 pound unsalted butter at room temperature
1 cup sugar
1 teaspoon pure vanilla extract
2 Tbsp instant coffee
1 Tbsp hot water
3 1/2 cups flour
1/4 teaspoon kosher salt
500 grams bittersweet chocolate, roughly chopped
Wasabi salt to top, optional

Directions

Preheat the oven to 350 degrees F.

In a small bowl, combine the instant coffee and water, combine until all crystals are dissolved. In the bowl of an electric mixer with the paddle attachment, cream together the butter and 1 cup of sugar until they are just combined. Add the vanilla. In a medium bowl, sift together the flour and salt; then add them to the butter-and-sugar mixture. Mix on low speed until the dough starts to come together. Dump onto a surface dusted with flour and roll shape into a flat disk. Wrap in plastic and chill for 30 minutes.

Roll the dough 1/2-inch thick and cut with a 2-inch snowflake-shaped cutter. Place the snowflakes on an ungreased sheet pan – place in fridge to chill – this will help the cookie retain its crisp edges.. Bake for 20 to 25 minutes, until the edges begin to brown. Allow to cool to room temperature.

Melt chopped chocolate over a water bath. Once nice and smooth (achieved with a whisk), dip each cookie into the melted chocolate, place on a cookie rack to set. Once the chocolate has cooled, but not fully set, add a small sprinkle of wasabi salt.

However you choose to celebrate, may you enjoy the beauty, warmth and tradition of this holiday season…hopefully with a little sweetness in hand! ~ bakergirl

Adapted from Ina Garten’s Shortbread Hearts Recipe.


I think it has a lot to do with the fact that I spent the first 20 years of my life on Vancouver Island, and also that I’ve never lived outside of British Columbia, but I love our weather (which is often criticized for including too much rain and not enough sunshine) and I especially love the Fall season. Sure, I wouldn’t mind if Summer lasted a few extra weeks (after all who doesn’t enjoy the sunshine?) but there’s something about cozying up with a warm sweater or blanket, a good book (or a favourite blog) and that perfect comfort food meal that rejuvenates me inside and out.

Fall

I recently had the opportunity to browse through a copy of Michael Smith’s The Best of Chef at Home: Essential Recipes for Today’s Kitchen sent to me and I must say that the general feel of the book, it’s recipes, and the photos fits my mood and our Fall season perfectly. To tie it into the general baking theme here at Bakergirl Creations, I’m going to focus on Chef Michael’s ‘Treats & Baked Goods’ chapter, and because when I first opened the book to thumb through it, the Old Fashioned Apple Pie on page 235 was where I started. Oh how I love home made apple pie!

©jackieconnelly_apples

Here is Michael’s recipe:

Pastry
2 1/2 cups of all-purpose flour
2 tablespoons of white sugar
1 teaspoon of salt
2 sticks of frozen butter
12 tablespoons of ice water

Filling
6 or 8 large Honey Crisp or Granny Smith apples, peeled, cored and sliced
1/2 cup of brown sugar
2 tablespoons of all-purpose flour
1 teaspoon of ground cinnamon

Whisk the flour, sugar and salt together in a large bowl.

Using a standard box or potato grater, grate the frozen butter into the flour and toss lightly with your fingers until it’s thoroughly combined. Sprinkle in the ice water and stir wit your fingers, mixing and firmly kneading until the dough comes together in a ball.

Divide dough into 2 pieces; making sure that the one half is slightly larger than the other. Wrap in plastic wrap, flatten and chill for at least 30 minutes, or even overnight. Resting tenderizes the pastry, making it easier to roll.

Remove the pasty from the fridge and allow it to warm slight, just until it’s pliable. Lightly flour your hands, the rolling pin, your work surface and the dough.

Roll our the larger pastry piece into a circle large enough to slightly overlap the edges of a 9-inch glass deep-dish pie dish. As you roll, for ease of handling lightly flour the dough every time it’s diameter doubles, then flip it over and continue tolling. Transfer the dough to the pie dish by folding it into quarters, then unfolding it in the dish.

Preheat your over to 375degreed Fahrenheit (190degrees Celsius).

Toss the apple slices with the brown sugar, flour and cinnamon. Add the apple mixture to the bottom crust. Roll our the remaining smaller piece and carefully place it over the top of the piece.

Roll and crimp the edges of the dough together tightly sealing them. Poke a few vent holes into the top of the pie and place on the bottom rack of your over.

Bake for an hour or so, until the crust is golden and the juices are bubbling.

Click here to buy Chef Michael’s book from Amazon.

~ Guest post for Bakergirl Creations by Jackie Connelly


I am not a breakfast girl.  I know that it is the most important meal of the day, but I really struggle with sacrificing even 15 minutes of my sleep for breakfast.  That being said, I do enjoy breakfast.  The savoury aspect of eggs and bacon or sausages really appeals to me – pancakes, not so much.  I know they have good potential.  I just can’t seem to bring myself to eat them very often.  They are too sweet, too mushy.  So savoury it is.

A few weeks back I was cleaning out the fridge and found myself with some random bits and pieces that needed to be used: a few slices of bacon, an older jar of sundried tomatoes and a half bag of spinach.  My mind immediately went to a quiche, but Taster Boy is not a lover of quiche, too fluffy and full of eggs for him.  So I thought of a picture of a tart that I saw in Jamie Oliver’s book, Cooking at Home.  He had made it in a rimmed baking sheet, it looked rustic and a little different.  I pulled out the recipe and reviewed.  It called for it’s own version of crust and really focused on onions and spinach as the flavours.  Sounded good, but of course it had to be tweaked because I can seldom leave a recipe alone!

I opted to make my own stand by pastry crust but added about ½ a cup of sharp cheddar cheese, lowering the lard content to compensate.  This added a wonderful richness to the crust.  I used one egg and egg beaters to keep it a little healthier (yes, I know, adding the egg to the cheese to the crust was so not a healthy option, but pick and choose right?)  I loved that you could really throw anything into the tart.  Essentially whatever you would like with an omelet, you could add to this recipe.  Perhaps we should call this “Clean out the fridge Breakfast Tart”.

You could cut yourself a square of it and heat it up in the toaster oven, either at home or at work.  A grab and go breakfast that I literally have to just heat up is a good option for those of who prefer sleep and the snooze button.  I would love to hear what flavor combinations you might enjoy, or have already created yourself!

PS – my mom thinks this could be frozen well, because quiches can be frozen.  So I would individually cut and wrap in cellophane and then foil and then try.  Worth a shot if you have leftovers you don’t think you will get through.

Spinach tomato bacon tart

Ingredients:

Dough
2 cups AP flour
1 egg, beaten
1 Tbsp vinegar (I was out of regular vinegar and tried red wine, it was pretty good)
1 cup ice cold water (you won’t use all of this)
1/4 cup Crisco lard
½ tsp salt
½ cup shredded sharp cheddar cheese

Tart Filling
1 egg
1/3  cup egg beaters (2 eggs worth)
1 Tbsp Extra Virgin Olive Oil
2-3 cups clean washed spinach
1 medium sweet yellow onion, thinly sliced
½ cup shredded Parmesan cheese.
¼ cup chopped sundried tomatoes
4 slices of bacon, minced
salt and pepper to taste

Directions

  1. Prepare the dough by combining the flour and the salt on a clean counter top
  2. Add the Crisco, using two knives chop it up into the flour to create an oatmeal consistency.  You want it keep little “pebbles” of lard in the flour and not make it too fine because in the oven these will puff up and create the delicious flakiness you want with your pastry dough.  I always used to make the dough in a bowl.  But I found the knives a little cumbersome in a rounded object and then realized you are already going to roll the dough onto the counter, so why not just start there?
  3. Stir in the grated cheddar cheese
  4. Beat the egg in a small measuring cup, add the vinegar and then add cold water until you reach a one cup measure
  5. Make a small well in your flour mixture, pour about 1/3 of the liquid into the well.  With a fork start stirring the flour from the centre into the liquid and continue until fully combined.  You may need to add more water or flour depending on humidity of your flour
  6. Lightly grease your pan with either pam or a light light coating of butter.
  7. Roll out to fit your baking sheet.  Crimp edges, poke with fork and place in freezer for half an hour.  This way you don’t need to blind bake and then tart should not shrink too much or pull from the edges of the pan.
  8. Preheat oven to 425F
  9. Bake tart shell for 15-20 minutes, until just a about to brown.  This allows you to add the egg mixture and not get a soggy bottom tart.
  10. While the tart is baking, in a large non-stick frying pan heat up the EVOO on medium heat.  Add sliced onions (if you are daring and like garlic, add a minced clove or two, delish!) Slowly sautee onions. Don’t rush it let them sweat and cook down, not brown.
  11. Once onions have cooked for about 10 minutes, add spinach.  You may need to do this in batches depending on how big your pan is.  Allow to wilt. Cook out the liquid. If this isn’t happening, drain it from the pan.
  12. Set aside until ready to bake tart.
  13. In a small bowl combine the egg and beaters and whisk until light and frothy.  I find an immersion blender quite helpful to incorporate lots of air into it.
  14. In the prebaked tart, spread out the spinach and onion mixture, sprinkle the sundried tomatoes and minced bacon and then pour in the egg mixture.  Add the shredded parm on top.
  15. Turn oven down to 375F
  16. Place tart in the oven, allow to bake for about 20 minutes until the cheese is golden and bubbling.
  17. Remove and let cool to reasonable warm temperature, or even room temp and enjoy!

“Raspberry muffins.”  That was what was requested for breakfast by my 5 year old nephew a few weekends ago when we looked after him and his 2 year old sister.  We didn’t have raspberries, so it was off to the the grocery story.  They too didn’t have any.  The choices were down to blueberries and blackberries.  Blackberries were “close enough” I was informed.  So with my little helpers gathered around the world’s smallest kitchen we made these super easy muffins.  The results paid off!  Faces smeared with blackberries, and seconds asked for.  A successful collaboration I am positive of.

I found this recipe over at Gourmet Girl’s site.  I had been intrigued by the yogurt in the recipe.  I had made it a few weeks back for Friday treats at work.  So this go round with the kiddies I thought I would try it again.  However instead of plain or vanilla yogurt I opted maple flavoured yogurt, topped with maple sugar instead of vanilla sugar.  Regardless of what combination you built this as, I am sure they would work out.  A great standby to have kicking around when muffins are needed in a flash.

Blackberry Muffin_2

Ingredients:
12-1/2 ounces cake flour (3 cups)
1 cup sugar
1 teaspoon baking soda
2 teaspoons baking powder
1/8 teaspoon salt
1 teaspoon vanilla
1 egg
1 cup maple yogurt
1/2 cup vegetable oil
2 cups blackberries, (1 pint)
1/8 cup maple sugar for sprinkling tops
paper liners or buttered muffin tins

Directions:

  1. Preheat oven to 350 F
  2. Sift all dry ingredients into a large bowl and set aside. In a small bowl toss blueberries with about 1 tablespoon of flour mixture and set aside.
  3. Whisk all wet ingredients together and mix well.
  4. Add wet ingredients to flour mixture and mix with a wooden spoon until just barely combined. add blackberries and mix lightly. Do not over mix.
  5. With an ice cream scoop fill muffin pan almost all the way to the top. top with sugar generously and bake for 20 minutes or until golden brown. Remove muffins from pan as soon as they are cool enough to handle. They will keep for 3-4 days covered at room temperature.

Makes 18 muffins


Summer fruits are in full abundance.  The delicious sweet nector of stone fruits: peaches, nectarines, apricots and plums.  The simplicity of the fruit calls for a complimentary simple preparation.  Last weekend we were invited to some old friends for a BBQ.  On the menu was slow BBQ’d ribs, corn on the cob and salad.  Such southern comfort food needed a simple but tastey dessert: peach cobbler and vanilla ice cream!

I was debating between blueberries and peaches, but you could easily make this with just about any summer fruit.  I was thinking about blackberries, raspberries or apricots…or you could mix them and it would be delicious.  The only thing that took time in this recipe was the peeling of the peaches, other than that, it took no time flat.  Isn’t overly pretty to look at, but tasted pretty darn good if I might say so myself.  I could have eaten the whole thing!  (good thing I had some help!)

peach cobbler

Ingredients:
6 medium/large peaches
Juice from one orange
2/3 cups sugar

1/3 cup melted butter
1 cup cake flour (it gives more rise, but you could certainly use AP flour)
1 Tbsp baking powder
1/4 tsp salt
1 cup sugar
1 cup whole milk – I didn’t have it, so used 1/2 whipping cream and 1/2 skim milk
cinnamon (optional)

Directions:

  1. Put oven rack in middle position and preheat oven to 375F
  2. Cut an “x” in bottom of each peach with a sharp paring knife and blanch peaches in 2 batches in a large sauce pan filled with boiling water for 10-20 seconds.  Immerse into a ice water.
  3. Peel off skin with a paring knife, begining wtih the scored end and sicard.  Half peaches and then pit and cut lenghwise into 1/4 inch slices.
  4. Rince out pot, and then transfer peaches, ,orange juice and 2/3 cups sugar.  Bring to a boil over high heat, stirring constanly, then noil sitrring occasionally, 5 minutes.  Remove from heat.
  5. Pour melted butter into a 13″x9″ bking dish.
  6. Whisk together flour, baking powder, salt 1 cup sugar in abowl.
  7. Thene whisk in milk until just combined.
  8. Pour batter over butter in pan (do not stir).
  9. Pour peaches over batter (do not sitr)
  10. Sprinkle lighly with cinnamon if desirede.  Bake until cobbler is bubbling and top is golden brown, 40-45 minutes.
  11. Cool in pan on rack until warm, 25 minutes.
  12. Serve with whipped cream or vanilla ice cream

Serves 6,

Next Page »