Cakes


TB’s friend is getting married in two weeks. The boys wanted to plan a weekend in Vegas, but the groom was in a car accident and long flights just weren’t an option. So they did Vegas in Van-city.  Friday night was boys night out… suits, cigars, scotch and other things…. tonight is a poker tournament and a big BBQ.  I offered to make a cake in the theme.

This friend is pretty picky when it comes to flavours. He doesn’t like creams, custards etc. Normally if I was to make a cake, I would want to add flavour through the filling. His preferred filling was chocolate chip mint.  Mint as a filling reminds me of the 80’s – probably because as a kid I LOVED it and always wanted icing to be flavoured with it… and now, no interest. So the cake itself is not too interesting. The decorating worked out ok. I used chocolate fondant dyed black, and then regular fondant in green for the felt. All the pieces are edible (except for the playing cards).  The picture is a little fuzzy, but I didn’t think to bring a camera, only had my phone. Still, for something whipped together Friday night for Saturday, I was pretty happy with it.   Congrats to J & T. Hoping they have a long happy life together.


Friends got married last weekend.  They are a fantastic match and I am so happy for them!  It was a beautiful day, the sun was shining, but it wasn’t so hot that the men sweating in the sun, or the women had make up melting off their faces.

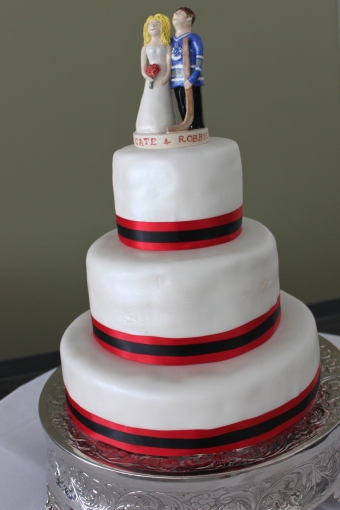
In February I was asked by the couple to make their wedding cake. I asked what they were thinking about. They wanted simple.  Good, because who are we kidding, while I enjoy baking I am no pastry chef!  I have made small cakes that serve 20-40 at most, not 150.  So I said yes, and offered the cake as my wedding present to them.

The cake was simple. Three tiers, three layers of cake in each tier. The bottom tier was chocolate brownie cake with a vanilla cream icing, and raspberry filling.  The middle tier was simple vanilla cake with a chocolate/Baileys (yes, can you say yum!) icing and the raspberry filling again.  And the top tier was chocolate/vanilla cake combo with the various fillings as well, kind of the uber tier.  The whole thing was covered in a vanilla buttercream with fondant.  Brushed with pearl dust to give it an iridescence that you can’t really see in the photos and finished off with ribbons in their wedding colours.  The cake topper was made by the bride’s mom – a personal touch to the couple.

3 tier wedding cake with ribbon

wedding cake cutting

sliced vanilla wedding cake

So congratulations to Robbie and Cate!

May their years together be long and plentiful, full of love, laughter, and of course…good food!

Summer fruits are in full abundance.  The delicious sweet nector of stone fruits: peaches, nectarines, apricots and plums.  The simplicity of the fruit calls for a complimentary simple preparation.  Last weekend we were invited to some old friends for a BBQ.  On the menu was slow BBQ’d ribs, corn on the cob and salad.  Such southern comfort food needed a simple but tastey dessert: peach cobbler and vanilla ice cream!

I was debating between blueberries and peaches, but you could easily make this with just about any summer fruit.  I was thinking about blackberries, raspberries or apricots…or you could mix them and it would be delicious.  The only thing that took time in this recipe was the peeling of the peaches, other than that, it took no time flat.  Isn’t overly pretty to look at, but tasted pretty darn good if I might say so myself.  I could have eaten the whole thing!  (good thing I had some help!)

peach cobbler

Ingredients:
6 medium/large peaches
Juice from one orange
2/3 cups sugar

1/3 cup melted butter
1 cup cake flour (it gives more rise, but you could certainly use AP flour)
1 Tbsp baking powder
1/4 tsp salt
1 cup sugar
1 cup whole milk – I didn’t have it, so used 1/2 whipping cream and 1/2 skim milk
cinnamon (optional)

Directions:

  1. Put oven rack in middle position and preheat oven to 375F
  2. Cut an “x” in bottom of each peach with a sharp paring knife and blanch peaches in 2 batches in a large sauce pan filled with boiling water for 10-20 seconds.  Immerse into a ice water.
  3. Peel off skin with a paring knife, begining wtih the scored end and sicard.  Half peaches and then pit and cut lenghwise into 1/4 inch slices.
  4. Rince out pot, and then transfer peaches, ,orange juice and 2/3 cups sugar.  Bring to a boil over high heat, stirring constanly, then noil sitrring occasionally, 5 minutes.  Remove from heat.
  5. Pour melted butter into a 13″x9″ bking dish.
  6. Whisk together flour, baking powder, salt 1 cup sugar in abowl.
  7. Thene whisk in milk until just combined.
  8. Pour batter over butter in pan (do not stir).
  9. Pour peaches over batter (do not sitr)
  10. Sprinkle lighly with cinnamon if desirede.  Bake until cobbler is bubbling and top is golden brown, 40-45 minutes.
  11. Cool in pan on rack until warm, 25 minutes.
  12. Serve with whipped cream or vanilla ice cream

Serves 6,


The June Daring Bakers’ challenge was hosted by Jasmine of Confessions of a Cardamom Addict and Annemarie of Ambrosia and Nectar. They chose a Traditional (UK) Bakewell Tart… er… pudding that was inspired by a rich baking history dating back to the 1800’s in England.
I was looking forward to this challenge because it was simple… and something new for me.  Apparently these little tarts or puddings, or whatever you want to call them are quite popular in the UK.  One of my favourite things is when a recipe’s ingredients can all be found in my cupboard… no shopping needed!

The optional elements of this challenge were the sizes of the tarts: individual, medium or one big tart and then the fruit/curd filling…we could use whatever we had, homemade or store bought.  I have just returned from a visit with my grandmother in the Okanagan, and on the way home picked up 10 lbs of perfectly fresh cherries.  So I have opted to make a quick stove-top cherry compote to accompany these.  Served with deliciously creamy icecream – a great summer treat!

bakewell tart

Tart Ingredients:

One quantity sweet shortcrust pastry (recipe follows)
Flour for dusting
250ml (1cup (8 US fl. oz)) jam or curd, warmed for spreadability
One quantity frangipane (recipe follows)
One handful blanched, flaked almonds

*   *   *   *   *   *   *   *

Sweet Shortcrust Pastry Ingredients

225g (8oz) all purpose flour – I used Whole Wheat AP flour
30g (1oz) sugar
2.5ml (½ tsp) salt
110g (4oz) unsalted butter, cold (frozen is better)
2 (2) egg yolks
2.5ml (½ tsp) almond extract (optional)
15-30ml (1-2 Tbsp) cold water

Directions:

  1. Sift together flour, sugar and salt.
  2. Grate butter into the flour mixture, using the large hole-side of a box grater. (this part was brillant)
  3. Using your finger tips only, and working very quickly, rub the fat into the flour until the mixture resembles bread crumbs. Set aside.
  4. Lightly beat the egg yolks with the almond extract (if using) and quickly mix into the flour mixture.
  5. Keep mixing while dribbling in the water, only adding enough to form a cohesive and slightly sticky dough.
  6. Form the dough into a disc, wrap in cling and refrigerate for at least 30 minute

*   *   *   *   *   *   *   *

Frangipane Ingredients
125g (4.5oz) unsalted butter, softened
125g (4.5oz) icing sugar
3 (3) eggs
2.5ml (½ tsp) almond extract
125g (4.5oz) ground almonds
30g (1oz) all purpose flour

Directions

  1. Cream butter and sugar together for about a minute or until the mixture is primrose in colour and very fluffy.
  2. Scrape down the side of the bowl and add the eggs, one at a time, beating well after each addition. The batter may appear to curdle.  Really. It’ll be fine.
  3. After all three eggs are in, pour in the vanilla extract and mix for about another 30 seconds and scrape down the sides again.
  4. With the beaters on, spoon in the ground nuts and the flour. Mix well. The mixture will be soft, keep its slightly curdled look (mostly from the almonds) and retain its pallid yellow colour.

Assembling the Tart

  1. Place the chilled dough disc on a lightly floured surface. If it’s overly cold, you will need to let it become acclimatised for about 15 minutes before you roll it out.
  2. Flour the rolling pin and roll the pastry to 5mm (1/4”) thickness, by rolling in one direction only (start from the centre and roll away from you), and turning the disc a quarter turn after each roll.
  3. When the pastry is to the desired size and thickness, transfer it to the tart pan, press in and trim the excess dough. Patch any holes, fissures or tears with trimmed bits.
  4. Chill in the freezer for 15 minutes.
  5. Preheat oven to 200C/400F.
  6. Remove shell from freezer, spread as even a layer as you can of jam onto the pastry base.
  7. Top with frangipane, spreading to cover the entire surface of the tart.
  8. Smooth the top and pop into the oven for 30 minutes.
  9. Five minutes before the tart is done, the top will be poofy and brownish.
  10. Remove from oven and strew flaked almonds on top and return to the heat for the last five minutes of baking.

The finished tart will have a golden crust (unlike mine with the almost black edges – still tasted good though!) and the frangipane will be tanned, poofy and a bit spongy-looking. Remove from the oven and cool on the counter. Serve warm, with crème fraîche, whipped cream or custard sauce if you wish.

When you slice into the tart, the almond paste will be firm, but slightly squidgy and the crust should be crisp but not tough.  Check out many more fantastically delicious tarts…puddings (?) from the fantastically talented Daring Bakers!

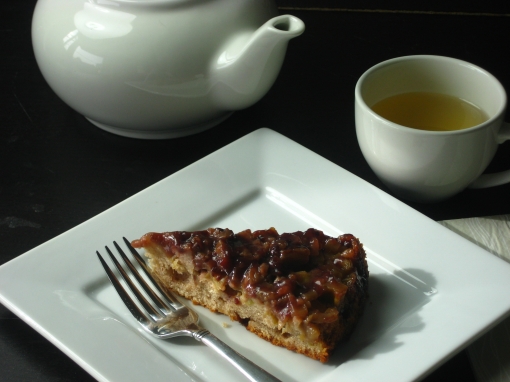
I have been a very delinquent blogger…almost two full weeks.  Sigh.  I feel like the weeks are flying by.  Do you remember as a kid you would listen to your parents talk about how fast time went and not really get what they were saying…after all the two months of summer vacation felt like an eternity.  And now, at the ripe old age of 29 (!) in a blink two weeks fly by.

Regardless, time marches on and one must eat.  And I must bake.  A good friend gave me some fresh rhubarb from her garden this week.  Mine, having only been rooted this spring will not produce.  I was delighted.  Now I know there are those who love rhubarb and those who don’t.  It seems to be one of those foods that you feel strongly one way or another.  I, myself, LOVE it.  As a kid, it was almost guaranteed that we would have bags of it frozen in our freezer throughout the year.  Nothing is easier than a quick rhubarb crumble.  The tang and the sweet are a wonderful combination.

With said friend coming over to walk around Stanley Park this morning, I thought it would be nice to have a treat waiting back at the house after our walk.  The recipe below is adapted from Dorie Greenspan’s Baking From My Home to Yours.  Her’s is the Cranberry Upside-Downer cake (page 206).  I made a few changes, and it all worked out.  Similar in taste to a coffee cake, this could easily be replicated with any favourite fruit (and yes, I know that rhubarb is not technically a fruit).

rhubarb upside down cake

Ingredients:

1/4 cup + 2 tablespoons butter
1/4 cup + 2 tablespoons brown sugar
2 cups finely chopped rhubarb
1/4 cup chopped pecans

1 cup AP flour
1 tsp baking powder
1 tsp ground cinnamon
1/4 tsp salt

1/2 cup butter, room temp
1/2 cup white sugar
2 large eggs
1 tsp vanilla extract
1/3 cup skim milk

1/3 cup blackberry jam, for glazing the cake

Directions:

  1. Preheat oven to 350F.
  2. Place a lightly greased round cake pan (I used a 9 inch pan, recipe called for 8 an inch pan) on a baking sheet.
  3. In a small saucepan melt butter and add brown sugar. Allow to come to a boil – stir to make sure is all melted.
  4. Pour butter sugar mixture into cake pan.
  5. Sprinkle pecans in pan, and add rhubarb to the pan. Gently smooth out with your hand and press down.  You want it evenly distributed.
  6. In a medium bowl whisk together: flour, baking powder, cinnamon, and salt – set aside.
  7. In a large bowl, beat butter until light and fluffy – about 1-2 minutes with an electric mixer.
  8. Add sugar – beat until pale and creamy, about 3 minutes.
  9. Ass the eggs, one at a time, scrape down sides between additions.
  10. Add vanilla.
  11. Reduce the mixer speed to low and add half the dry ingredients.  Beat together until you no longer see the dry flour – don’t over mix.
  12. Add the milk – beat together.
  13. Add remaining dry ingredients and full incorporate.
  14. Spoon the batter over the rhubarb and smooth with a rubber spatula.
  15. Bake for 40-45 minutes, or until the cake is golden and a thin knife inserted into the centre comes out clean.  Carefully turn cake out onto a serving plate/platter.  If any of the fruit sticks to the pan, just spoon out and add to the cake.  This happened to me (a few tablespoons – but you can’t tell).
  16. Warm the jam in the microwave (45 seconds).  And brush ontop of cake.
  17. Delicious served with frozen yogurt.

Enjoy!