Gifts


Friends got married last weekend.  They are a fantastic match and I am so happy for them!  It was a beautiful day, the sun was shining, but it wasn’t so hot that the men sweating in the sun, or the women had make up melting off their faces.

In February I was asked by the couple to make their wedding cake. I asked what they were thinking about. They wanted simple.  Good, because who are we kidding, while I enjoy baking I am no pastry chef!  I have made small cakes that serve 20-40 at most, not 150.  So I said yes, and offered the cake as my wedding present to them.

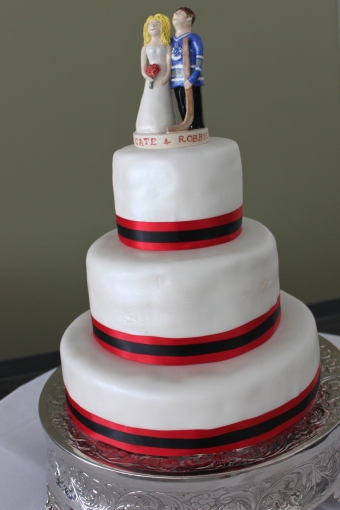
The cake was simple. Three tiers, three layers of cake in each tier. The bottom tier was chocolate brownie cake with a vanilla cream icing, and raspberry filling.  The middle tier was simple vanilla cake with a chocolate/Baileys (yes, can you say yum!) icing and the raspberry filling again.  And the top tier was chocolate/vanilla cake combo with the various fillings as well, kind of the uber tier.  The whole thing was covered in a vanilla buttercream with fondant.  Brushed with pearl dust to give it an iridescence that you can’t really see in the photos and finished off with ribbons in their wedding colours.  The cake topper was made by the bride’s mom – a personal touch to the couple.

3 tier wedding cake with ribbon

wedding cake cutting

sliced vanilla wedding cake

So congratulations to Robbie and Cate!

May their years together be long and plentiful, full of love, laughter, and of course…good food!

It’s cookie season.  It’s cookie exchange time. I love seeing what everyone makes.  I love that there are twelve days of cookies on Foodtv.com.  Ironically I don’t even love cookies.  I just love the opportunity to get into the kitchen.  I love trying something new.

My mom and my brother’s girlfriend get together every year around this time to spend a whole day in the kitchen and make winter goodies.  It’s the winter equivalent of “putting up” the harvest by canning in the fall/summer I suppose.   This is one of the recipes they had tried together.  My mom was telling me that I “had to try” to make them.  That they would be so easy and you just couldn’t go wrong with them.  Perhaps she was right…but it took me way longer to make these than it would have taken me to make regular cookies, and in my oh, so humble opinion they were waaaaaaaaay more labour intensive than drop cookies.

That being said, they aren’t really cookies.  They are more of candies.  Almonst a chewy Almond Roca.  I thought my mom had created these, but upon some internet searching, I believe it was Giada De Laurentis’ recipe.  As usual, I reviewed and looked at ways to put my own spin on them.  I opted to roll them in chopped up toasted almonds.  Building on the almondy goodness.

As I munched on my one tester.  I think I would do them differently next time.  I think the idea is right, but the texture needs a little work.  The caramel centre is a little confused.  It is kind of chewy, and kind of brittle.  I feel like it needs to be one or the other…otherwise my jaw might need strengthening if I was to eat these on a more regular basis…come to think about it, perhaps it is a good idea that you can only eat one or two at the most at a time.  IF I was to make these again, I think I would make my own caramel.  I would add the almonds to the silicone liners and then ladle in the almond roca caramel mixture into the cups, cool and set, and then dip in the choclate and roll in the crushed almonds.  Basically creating little Almond Roca bites, rather than the bark I made a few years ago.

Ingredients:

1/2 cup (about 3 ounces) toasted slivered almonds
24 individually wrapped caramel candies (about 6 ounces)
1 cup (about 6 ounces) bittersweet chocolate chips
4 to 6 tablespoons cream, room temperature, divided
1 cup (about 6 ounces) white chocolate chips

1 cup toasted chopped slivered almonds

Directions

  1. Preheat the oven to 350 degrees F.
  2. Lightly grease the mini-muffin tins with vegetable oil spray. If you have silicone mini muffin liners or the pan, use that instead and you won’t need the oil.
  3. Place 1 teaspoon of slivered nuts in each of the muffin cups. Unwrap the caramel candies, cut each candy into quarters and place 2 quarters (1/2 candy) in each of the muffin cups, in the bottom, add the nuts and then add the other 2 quarters on top of the nuts in a single layer. Bake in the oven until the caramel is just melted and beginning to spread, about 8 minutes. Be careful not to over melt the caramel or it will bubble, burn, and become too hard. Place the mini muffin tins in the refrigerator for 5 minutes to cool. Remove the nut clusters from the tins and set aside.
  4. Meanwhile, melt the bittersweet chocolate in a double boiler over low heat. Whisk 2 to 3 tablespoons of cream into the chocolate to slightly thin the chocolate for coating the clusters. Dip half of the nut clusters in the bittersweet chocolate , remove exand place on a parchment paper-lined baking sheet. Return the clusters to the refrigerator to harden, about 30 minutes.
  5. Melt the white chocolate in a double boiler over low heat. Wisk 2 to 3 tablespoons of cream into the chocolate to slightly thin the chocolate for coating the clusters. Dip remaining half of the nut clusters in the white chocolate and place on the parchment paper-lined baking sheet with the other chocolate-covered clusters. Return the clusters to the refrigerator to harden, about 30 minutes.


Cookies, cookies, cookies! A few weeks back, I attended a cookie exchange, hosted by non-other than the lovely Ms. Jackie Connelly. A sunny (albeit, blustery) Sunday afternoon, armed with two dozen cookies, and a bottle of wine, I spent the afternoon with some fantastic foodies.

Cookie exchanges are a fantastic way to expand your horizons. Sometimes we, and by we, I really should really say, I get into ruts in the kitchen. I tend to default to the tried and true. As a kid, my mom made THE best chocolate chip cookies. Undoubtedly there was always cookie dough in the freezer to thaw and have cookies at your finger tips. That tends to be my go-to cookie.

A cookie exchange means you can stay within your comfort zone, if you really want, but sample the wonderful selection brought to the table from all the other participants. You could always make your usual, but why not try something new? There are so many options out there, it can almost become overwhelming. Narrow it down, do you want chocolate? Chewy? Traditional? Maybe you don’t even want a cookie, but perhaps a truffle…be daring!  For a handful of great recipes from this cookie exchange, you can find them on Jackie’s site.

In my adult life, access to cookies was/is not as important. I prefer savoury to sweet. But, it is the holidays, there are guests, and little home-baked packages to be dropped off…and so, into the kitchen we all head.

As usual, I started with a base recipe, tweaked it, and made it my own. I was inspired to put a little wasabi salt on the chocolate as it set to counter the sweetness of the chocolate, and compliment the buttery-ness of the shortbread. It’s all about exploration right? And in this case, I thought it paid off!


Ingredients

3/4 pound unsalted butter at room temperature
1 cup sugar
1 teaspoon pure vanilla extract
2 Tbsp instant coffee
1 Tbsp hot water
3 1/2 cups flour
1/4 teaspoon kosher salt
500 grams bittersweet chocolate, roughly chopped
Wasabi salt to top, optional

Directions

Preheat the oven to 350 degrees F.

In a small bowl, combine the instant coffee and water, combine until all crystals are dissolved. In the bowl of an electric mixer with the paddle attachment, cream together the butter and 1 cup of sugar until they are just combined. Add the vanilla. In a medium bowl, sift together the flour and salt; then add them to the butter-and-sugar mixture. Mix on low speed until the dough starts to come together. Dump onto a surface dusted with flour and roll shape into a flat disk. Wrap in plastic and chill for 30 minutes.

Roll the dough 1/2-inch thick and cut with a 2-inch snowflake-shaped cutter. Place the snowflakes on an ungreased sheet pan – place in fridge to chill – this will help the cookie retain its crisp edges.. Bake for 20 to 25 minutes, until the edges begin to brown. Allow to cool to room temperature.

Melt chopped chocolate over a water bath. Once nice and smooth (achieved with a whisk), dip each cookie into the melted chocolate, place on a cookie rack to set. Once the chocolate has cooled, but not fully set, add a small sprinkle of wasabi salt.

However you choose to celebrate, may you enjoy the beauty, warmth and tradition of this holiday season…hopefully with a little sweetness in hand! ~ bakergirl

Adapted from Ina Garten’s Shortbread Hearts Recipe.

Some friends of ours recently got married – but it was a small and intimate affair back home in Ontario.   So of their West coast friends decided to throw a small celebration last weekend.  Our contribution to the spread was the wedding cake.

I used the lemon drop cupcake batter, a lemon flavoured buttercream icing and for the layers: lemon mascarpone filling…that part was my favourite!  Cover with fondont and voila… a pretty easy wedding cake for a casual affair.  No recipe has been posted in the past here.

Congratulations to Tam and Edwin!  May they have a lifetime of love, laughter and joy together.

wedding-cake


These were the cookie exchange cookies I made for my office.  The cookie monster would sing blissfully the cookie song if he got to enjoy these fresh from the oven! My friend Lana had posted in the comments that these cookies, featured in the New York Times in July were supposed to be the ultimate chocolate chip cookie…and they don’t disappoint!

The key to these are how delightfully moist they are, if baked absolutely perfectly. A smidge too long in the oven and they dry out. According to the recipe they should bake 18-20 minutes, however I found 15-18 worked better with my oven. The other wonderful aspect to these cookies is the combination of salty and sweet – absolutely melt in your mouth goodness!

cookies

The recipe can be found here, the only things I modified was that I didn’t have chocolate wafers, I just went with plane old chips and I used all purpose flour instead of the bread flour it called for.


It is the season of cookie exchanges, office goodie parties, and holiday baking to last through the month. Every where I turn people are busy in their kitchens, getting ready for company and some time to relax away from the hussel and bussel of every day life and prepare for a little hibernation.

Both my bookclub and office are holding cookie exchanges. Bookclub is today, and the office, tomorrow. I made two different batches of cookies for the two different exchanges, the roca cookies, and the perfect chocolate chip cookies (stay tuned for those!).

My very first blog entry last December was for home made almond roca bark. It is something I love! Mmm. But we don’t tend to eat the sweets during the rest of the year in the same way that we do over the holidays, so I figure it was time to bring those flavours back into the house.

As they bake the cookies smell amazing. The are solid and tasty and feel like a little bit of an extra special treat. I found this recipe on the Food Network website, courteousy of Lynn Scully.

almond-roca-cookies4

Ingredients:

2 1/2 cups all-purpose flour
1/2 teaspoon baking soda
1/4 teaspoon salt
1 cup dark brown sugar
1/2 cup sugar
1 cup butter, room temperature
2 eggs, room temperature
2 teaspoons pure vanilla extract
1 package toffee bits
1 cup coarsely ground almonds
4 ounces milk chocolate
1/2 tablespoon vegetable oil

Directions:

  1. Preheat oven to 300 degrees F.
  2. In a medium mixing bowl, whisk together flour, baking soda, and salt. Set aside.
  3. In the bowl of an electric mixer, blend sugars together on medium speed.
  4. Add butter and mix to form a grainy paste.
  5. Add eggs and vanilla and mix at medium speed until light and fluffy. At low speed, slowly add the flour mixture and then the toffee bits. Mix until just blended; do not over-mix.
  6. Place ground nuts in a small bowl. Using hands, roll balls of dough into 1 to 1 1/2-inch balls, then roll in the ground nuts. Place on cookie sheets several inches apart.
  7. Bake approximately 22 minutes and then transfer cookies to a cooling rack.
  8. Melt the chocolate with the vegetable oil in a double boiler or in a bowl set over a pan of simmering water.
  9. Drizzle melted chocolate over cooled cookies.
  10. Place cookies on a cookie sheet and place in freezer or refrigerator until chocolate is firmly set.

Yields 6 dozen small cookies.


Back in August, the bounty of the summer season was upon us. There is nothing like the farmer’s markets overflowing with such fresh and wonderful looking produce. In the middle of August we were in the Okanagan and picked up 15 lbs of Roma tomatoes, amongst other things. I thought I would take a stab at making some salsa to store away for those fall and winter months that need livening up with summer’s freshness.

Our friends who got married this summer gave home made salsa and raspberry jam that we made as favours for the wedding. I didn’t have that recipe so I started scouring the internet. I will admit that the concern over the acidity of the salsa (to make sure it was high enough) was a little nerve racking. I was planning on using a hot water bath (HWB) instead of a pressure cooker. Afterall, I didn’t want to kill anyone with botulism.

I finally came across this recipe from several years ago, on the iVillage Garden Web. I made some slight modifications based on notes from many of the reviews. The biggest change was that I did not de-seed the tomatoes. I had read that roma tomatoes are a paste tomato thickening sauces, so I wanted to keep the liquid from the seeds, we prefer our salsa to be on the thinner consistency, not super thick. We also made it a little spicier than the original recipe.

I was really happy with the result. It is a medium hot salsa – we like it that way, however all you have to do is reduce the hot peppers if you want something a little milder. I will be making this for years to come, and will make more than just the one batch… next summer! (A big thank you to Annie for sharing this great recipe!) I didn’t take any pictures of the salsa back when I made it. Today was a gorgeous day, with lots of natural light, so I finally dug it out to add to the blog.

salsa

Ingredients:
8 cups roma tomatoes, peeled, chopped
2 ½ cups chopped onion
1 ½ cups chopped green pepper
8 chopped jalapeños
2 chopped Serrano peppers
6 cloves minced garlic
2 tsp cumin
2 tsp pepper
1/8 cup pickling salt
¼ cup chopped fresh parsley
1/3 cup sugar
1 cup red wine vinegar (or you could use lemon and lime juice as well)
16 oz. can tomato sauce
4 oz tomato paste

Directions

  1. When chopping vegetables, be careful with the hot peppers. I didn’t wear gloves a few months back and seeded and chopped about 20 jalapeños. I experienced some pretty intense burns on my hands…I don’t wish that on anyone! I used my little food processor this time for the peppers and garlic. Super fast work of a tedious job!
  2. Mix all ingredients, bring to a boil, boil 10 minutes.
  3. Heat rubber rimmed tops in hot water, not boiling.
  4. Pour salsa into hot sterlized jars, wipe rims with a damp paper cloth. Place rubber rimmed tops on and tighten ring.
  5. Process for 15 minutes for pints.

Makes 9 pints.


One of my favourite things about the fall is the ensuing harvest!

Yesterday was our second annual canning extravaganza. A group of my friends come together, everyone bringing bits and pieces for the day and then we mass produce our preserves and split everything at the end. Last year we canned Spicy Pickled Beans, Peaches, Hot Pepper and Garlic Jelly (courtesy of Fiber at 28 cooks) and a variety of jams. Now we loved everything but the jam. Collectively as a group we don’t eat enough jam to warrant the volume we created…and truly you can only give away so much!

This year we repeated the pickled beans, and garlic jelly (too late for the peaches in our part of the world) and added garlic dill pickles to our repertoire. The most time consuming part of the day was pealing the garlic. Other than that, we were fairly efficient and were pleased with the results. Special thanks to Brent for playing photographer!


Below are all the recipes we used and the quantities that we used to make enough for 4 couples (no kids!).

Spicy Pickled Beans Ingredients

20 x 500 mL jars
9 lbs Young green beans
20 long, thin red chilies (cut into eighths)
80 large Garlic cloves (4 per jar)
1/4 tsp per jar Peppercorns (white, black, green or a mixture)
1/4 cup loosely-packed fresh dill sprigs per jar
12 + 1/2 cup water (12 ½ cup)
12 + 1/2 cup white vinegar (12 ½ cup)
1 1/4 cup table salt

Directions

  1. Trim and strings from the beans. Rinse well and set aside.
  2. Peal and prepare garlic, slice hot peppers (make sure to wear gloves, nasty burns can ensure if you aren’t careful!)
  3. Sterilize jars and lids in not quite boiling water. When jars are cool enough to handle, fill each upright with beans until they are snug. Insert chilies and garlic cloves (preferably around outside so they can be seen). Divide peppercorns and dill among jars.
  4. Separately bring the water, vinegar and salt to a boil in a non-reactive sauce pan. Ladle the hot brine over the beans leaving about 1/2-inch head space.
  5. Wipe jar edge clean and screw on sterilized lid and band according to manufacturers instructions.
  6. Process in a boiling water bath for 12 minutes (no more, or you get soggy beans!). Remove and allow to cool completely at room temperature away from drafts.
  7. Check lids to make sure proper seal has been attained.
  8. Store for at least six weeks before using to allow flavours to develop. – YUM – so good with Caesars or just on their own.

Hot Pepper and Garlic Jelly
30 x 250 mL jars

6 red bell peppers, minced
4 cups fresh mix hot peppers, chopped
2 cups minced garlic
6 cups white vinegar
24 cups sugar – I know that is so much!
8 tsp cracked black pepper
4-5 pkt liquid Certo (4 for a more liquidy jelly and 5 for a little more strength to it)


Directions:

  1. Place all ingredients in large saucepan and mix well. Bring to a boil, stirring often – watch though, because once this comes to a boil, it is a little temperamental.
  2. Boil for 5-6 minutes. Remove from heat and add Certo. Stir well.
  3. Pour into sterilized jars and cover with prepared lids to seal (specific canning instructions are below)

*The easiest way to can is this – wash and dry canning jars thoroughly. Place lids and rings in a pot of barely simmering water. Once jelly is ready, fill a jar, leaving about a 1/4″ headspace. With tongs, remove lid and ring from water, place on jar, and tighten, although not all the way. Turn jar upside down on a dishtowel. Repeat with remaining jars. Allow to cool for 10-15 minutes. Turn upright and allow to seal. Tighten rings on all jars. If any of the jars don’t seal, simply store in the refrigerator once cool. The other jars can be stored in a pantry for 8 months to a year, if it lasts that long.

A special thank you to Fiber for this great recipe. It is amazing with crackers and cheeses, mixed in cream cheese as a dip, my mom even uses it with sausage rolls. I imagine spring rolls would be nice with it too!

Garlic Dill Pickles
28 x 1 L jars

30 lbs fresh pickling baby cukes
13 1/2 cups vinegar
45 cups (11 Litres + 1 cup) water
3 3/8 cups pickling salt
10 Bunches of dill
Bowl of peppercorns (1/4 tsp per jar)
140 peeled whole garlic cloves

Directions:

  1. Sterilize canning jars in a hot oven.
  2. Scrub cucumbers in cold water until clean.
  3. Bring a large vat of water, enough to cover all the cucumbers, to a boil.(I think we used about 30 Liters to cover up the cukes in the sink).
  4. Pour boiled water over cucumbers in a well cleaned and rinsed sink and let sit for 20 minutes.
  5. Meanwhile peel garlic, set aside peppercorns, clean and separate out dill bunches.
  6. In another pot add vinegar, water, salt to a boil – DO NOT over boil or salty pickles will be had by all
  7. Pull hot jars from oven and to each jar add a handful of dill (or more if you like dilly-ious pickles),5 cloves garlic, and peppercorns.
  8. Tightly pack jars with hot pickles – this turned into a race for us and was lots of fun to see which way worked best!
  9. Fill each jar with hot/boiling brine (~2 cups per jar), leaving 1/2″ headspace.
  10. Adjust lids/rings and seal tightly – no processing needed.

A big thank you to my good friend, Tlell for this recipe she has shared. She and her mom make these pickles and as a receiver of such a nice treat, I must be sure to pass along credit where credit is due!


August is always a crazy month for me. Getting ready for classes to start again, and for the return of students I still am amazed how fast the month flies by. So while I haven’t been posting, I have been busy, and busy with lots of food related stuff.

We went to the family reunion in the Okanagan, and brought back with us, some peaches, pears, cherries, tomatoes and peppers…and so I have been busy canning some new stuff (to be posted later when I get a decent picture of the jars in natural light).

As I was sitting at the table looking at the freshly canned Roma tomatoes, I started to think about how I could have walked about 50 feet to the little grocery store practically out my door and picked up a tin of tomatoes for a measly buck something, there is something so satisfying doing it myself.

Then, as it often does, my mind wondered away and I started thinking about random things I could try to make from home…. I am not sure if anyone has ever watched “How It’s Made“, but it tends to be something that catches my attention, perhaps because it helps me think about how I could make things that we so often run out to the store to buy. I just love the challenge of trying to make something at least once…and so came the ah, ha moment when I thought, why don’t I make my own gummy candies. Truly I have never desired to do it, but I figured the kitchen is already a mess, why not!? The result is below… not exactly the same as the junk you can buy at the corner store, but still kind of fun. We made the recipe below twice, first raspberry flavoured and then lime. I’m looking forward to trying to make these with my nephew!

Ingredients:

1 package flavored jello
6 packages unflavored gelatin
1/2 cup cold water

Directions:

1. In a small saucepan, mix both the flavored and the unflavored gelatin.

2. Stir the gelatins up. Pour cold water in mixture and stir with a spatula until you have a gloppy-chunky blob not unlike play-doh.

3. Turn heat stove top burner on medium and melt blob.

4. Stir the blob constantly until melted.

5. Spray molds very lightly with a vegetable spray like Pam.

6. Pour the melted mixture into miniature bear molds, or other small candy type molds.

7. Place filled molds in freezer for 10 minutes to cool.

** I don’t have candy molds but I do have silicon shapes ice cube trays from Ikea…and as a result, flowers and puzzle pieces. Voila!

Recipe from Marianne Dambra

This month’s Daring Bakers’ challenge was a success, posting it was not! The deadline to post was Sunday, today is Thursday…. I even had done the challenge a few weeks before, brought it into work for a birthday surprise but failed to take a picture of it before – oops… still new to this whole “take the picture of your food” thing.

Anyhow, Elle and Deborah from Feeding My Enthusiasms and Taste and Tell, respectively, hosted. They chose little cheesecake pops. The creativity of the other Daring Bakers was inspiring. I loved the people who had geometric shapes, perfectly cut and clean…then were those who had been meticulous with the details like the Daring Baker at Delicious Days.

Anyhow, mine were simple. The cheesecake recipe. Melted chocolate chips some vegetable shortening (mmm, yes I know, tasty tasty) and rolled in graham cracker crumbs. I would make these again for sure. They are cute, festive and most importantly yummy. The recipe below is the FULL recipe, I halved it, and I would halve it again, as it made nearly 25 pops (which was plenty).


Ingredients:
Makes 30 – 40 Pops

5X 8-oz. packages cream cheese at room temperature
2 cups sugar
¼ cup all-purpose flour
¼ teaspoon salt
5 large eggs
2 egg yolks
2 teaspoons pure vanilla extract
¼ cup heavy cream
Boiling water as needed
Thirty to forty 8-inch lollipop sticks
1 pound chocolate, finely chopped
(you can use all one kind or half and half of dark, milk, or white)
(Alternately, you can use 1 pound of flavored coatings, also known as summer coating, confectionary coating or wafer chocolate – candy supply stores carry colors, as well as the three kinds of chocolate.)
-2 tablespoons vegetable shortening

(Note: White chocolate is harder to use this way, but not impossible)

Assorted decorations such as chopped nuts, colored jimmies, crushed peppermints, mini chocolate chips, sanding sugars, dragees) – Optional

Directions:

  1. Position oven rack in the middle of the oven and preheat to 325 degrees F. Set some water to boil.
  2. In a large bowl, beat together the cream cheese, sugar, flour, and salt until smooth. If using a mixer, mix on low speed. Add the whole eggs and the egg yolks, one at a time, beating well (but still at low speed) after each addition. Beat in the vanilla and cream.
  3. Grease a 10-inch cake pan (not a springform pan), and pour the batter into the cake pan. Place the pan in a larger roasting pan. Fill the roasting pan with the boiling water until it reaches halfway up the sides of the cake pan. Bake until the cheesecake is firm and slightly golden on top, 35 to 45 minutes.
  4. Remove the cheesecake from the water bath and cool to room temperature. Cover the cheesecake with plastic wrap and refrigerate until very cold, at least 3 hours or up to overnight.
  5. When the cheesecake is cold and very firm, scoop the cheesecake into 2-ounce balls and place on a parchment paper-lined baking sheet. Carefully insert a lollipop stick into each cheesecake ball. Freeze the cheesecake pops, uncovered, until very hard, at least 1 – 2 hours.
  6. When the cheesecake pops are frozen and ready for dipping, prepare the chocolate. In the top of a double boiler, set over simmering water, or in a heatproof bowl set over a pot of simmering water, heat half the chocolate and half the shortening, stirring often, until chocolate is melted and chocolate and shortening are combined. Stir until completely smooth. Do not heat the chocolate too much or your chocolate will lose it’s shine after it has dried. Save the rest of the chocolate and shortening for later dipping, or use another type of chocolate for variety.
  7. Alternately, you can microwave the same amount of chocolate coating pieces on high at 30 second intervals, stirring until smooth.
  8. Quickly dip a frozen cheesecake pop in the melted chocolate, swirling quickly to coat it completely. Shake off any excess into the melted chocolate. If you like, you can now roll the pops quickly in optional decorations. You can also drizzle them with a contrasting color of melted chocolate (dark chocolate drizzled over milk chocolate or white chocolate over dark chocolate, etc.)
  9. Place the pop on a clean parchment paper-lined baking sheet to set. Repeat with remaining pops, melting more chocolate and shortening (or confectionary chocolate pieces) as needed.
  10. Refrigerate the pops for up to 24 hours, until ready to serve.


This recipe is adapted from Jill O’Connor’s book
Sticky, Chewy, Messy, Gooey: Desserts for the Serious Sweet Tooth

Next Page »